Monday, September 28, 2009

My New Portable Sewing Machine!

When we went to Utah last month to meet the new bebes in the family, we had some nap time to explore some antique stores. Next to the first store that we stopped at, there was a yard sale and this machine was in it.
My quality inspectors 'on the job'!

It was sitting on a table with yellow tape holding the electrical cord together and a very funky rigged up foot controller.

Priced at $10.

So I bought it.

The glue that held the wooden base together was very dry and it was coming apart and the cover was missing, but it wasn't rusted and the wheel turned freely.

Since I had researched a bit on vintage Singers, I knew that that there are resources to restore old machines, and The Mister is pretty handy with electrical stuff. At the time, I had not yet signed up for my quilt class, but I was planning to. The thought crossed my mind that I might have to bring my own sewing machine and my regular one is not portable.

A couple of weekends ago, we made it a project. He replaced the board on the bottom of the base and glued and clamped it all back together. I cleaned and oiled the head. We ordered a new motor and electrical connections and got it up and running. I even found a cover on ebay that fits perfectly!

I ordered the wrong bobbin case, so I have sent it back to exchange for the correct one before I can actually use it.

This machine is very modern, (built in 1935!) compared with my 'old' one, from 1891. This one has a forward and reverse! And, it is portable! (heavy, but portable!)

I can't wait to get the correct bobbin case so I can take it for a test drive!

Friday, September 25, 2009

Everybody wins! Yeah!

Do you remember going to the carnival and the barkers at the games promising "everybody wins"? Well in this case, it is true!

The winners are:

Lynne gets the gray apron with the Mexican couple.

Allie is the winner of the mustard and grey print.

Iron Needles will receive the atomic print.

Martha gets the brown gingham.

V wins the red print with the center point.

Thanks everyone for playing along with me! I can't wait to send these aprons off to their new homes!

(Please send me your address at: jan (dot) durham (at) gmail(dot) com)

I hope everyone has a great weekend!

Thursday, September 24, 2009

Helping Me Help Myself!

Thanks to everyone who has left a comment about the aprons! It is not too late to get in on the giveaway, so if you haven't already, de-lurk and tell me which one you would like. I will post the winners tomorrow evening. My enthusiasm for passing things along is building, so who knows? Maybe everyone will be a winner!!

Here is another one up for grabs if you are interested!

Hearts and Flowers
I am not sure if this one is a child's apron, or a 60's apron to cover a mini-skirt! It is small-ish, but the ties are long, so maybe it was for someone like Twiggy!

Tuesday, September 22, 2009

“Free to good home” Apron Giveaway!

Well, now that I have ‘outed’ myself as a hoarder (not in the worst possible way, but still...) I really must begin the process of shedding some ‘stuff’!

Mustard yellow with grey flowers.


So, I am having a giveaway!


Yellow and red bias cut with black detail on pocket and waistband.


Go here to see more aprons, freshly ironed (but not necessarily impeccably ironed…I am kind of a slap-dash iron-er).

Pick an apron from this post (or the Flickr set ) that you would like to have. Leave a comment before Friday (5pm Pacific) and tell me which one you would enjoy winning.

I will draw a name Friday evening and send the winner their choice.

Hostess apron - sheer black with purple and white print fabric and silver rick rack. It has some breaks in the black fabric, but the purple is good.

Go ahead and list first and second choices and I will pick two winners. Who knows, if you list three, I might give three away - that should start me down the road of de-cluttering!


White with evergreen and berries.

This apron is very soft and drapes really nicely. The design is painted faux embroidery, but nicely done!

One thing I have learned about myself in this process is that the thing that appeals to me about aprons is the fabric. I don’t think I could cut one up, though. I have a hard enough time cutting into new fabric, purchased for a project! (If you want to cut it up and make it into something else, I have no problem with that - it's a personal issue with me, not a moral position!)


Red with center point layers.

Very vintage-y!


Bright circles with bound hem and waist - '60's apron. Very bright and the fabric is like new!

And, I learned that all my aprons look good with a yellow dress!

Sunday, September 20, 2009

Vintage Aprons and Bias Tape Birds

I have been intending, for awhile, to go through some of the boxes and storage totes full of stuff in my 'room where no sewing occurs'. We have lived here three and a half years, and we have a little more than that left before we move again. I am not one of those folk who subscribe to the 'if you haven't used it in 6 months - get rid of it' theory, but I have a lot of stuff.

Before we moved to the desert, I loved going to estate auctions and sales. Lots of things went on ebay, but there was always stuff that just seemed to accumulate. When I think about moving it all again, well, I just don't think I need to.

So this weekend, I began the process, (which will surely be lengthy) to go through the things I have and sort into 'things I love' and 'things that I don't need to keep'.

I don't think this is something I 'love', but I love some things about it!

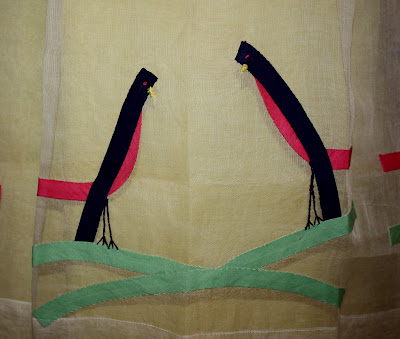
This apron is a sheer "hostess" apron adorned with birds made of bias tape and embroidery!

Aren't they the cutest?

The apron is very stiff - I am thinking it probably has never been used or laundered. To me, the way a fabric feels is as much a part of the appeal as the way it looks, so stiff is not something I am drawn to!

This apron is well used and very soft!

It also uses bias tape for embellishment - at the waist and the hem.

But look at this applique!

Someone put a lot of effort into making a very utilitarian garment pretty and whimsical! I love the colors of the bias tape and applique against the gray.

I have not decided where these aprons fall on the 'love or not' scale. After going through the storage tote and ironing 20 or so aprons, I am pretty sure that is more than I need! But when I was done - I put them all back in the box.

I will think about them another day!

Thursday, September 17, 2009

Moving From Collector to Creator

I have always loved quilts. For my high school graduation gift, I asked my mother to give me money to buy quilts from my Uncle Don.  Dearest Sister had gotten contact lenses for her graduation two years earlier, which were quite expensive in those days, so I got $250 to buy family treasures!

Uncle Don and Aunt Ruth lived in the house my Great Grandfather built and all the family linen treasures were still in bureau drawers, storage closets and the attic of the huge, three story house. Aunt Ruth was in a nursing home after a debilitating stroke and Uncle Don’s health was failing. I knew that he could use the money and even though he tried to refuse it and just give me the things I asked for, I made him accept the check. Also, so no one could say I took advantage of the soft spot that I knew Uncle Don always had for me.

The following spring, the house and the entire contents were sold at auction while I was studying abroad, so I have always been glad that I took the opportunity to ask for the quilts when I did.

This is one of the quilts that I got.


It is my understanding that it was made by my Aunt Ruth, from new yard goods. It was a project that she worked on while she was with my grandmother in the hospital during my grandmother’s final illness in the late 40's. It is the one of the few family quilts that I recall seeing that was not made predominately from scraps or feedsacks.


The finish of the fabric is a polished sateen.


The quilting is done in a small grid with the applique pieces outlined.
This is not one of the quilts that we pulled out of the cabinet in the winter to sleep under!


This one was!


I always refer to this one as a ‘postage stamp’ quilt because of the small pieces, but I am not sure if that is what other people would call it.


When I was taking the photos, I thought that I should put something in for size reference, so I took off my ring and put it on the blue plaid square. The ring is about 3/4" diameter, so the pieces are about an inch square.  This quilt shows the years of wear and laundry, but it is still impressive, I think.


In 1978, I signed up for a quilt class, but was not able to continue beyond the first lesson or two. A week ago, I signed up for a basic piecing class at a local quilt shop. It starts in November, so I have a couple of months of anticipation.

I hope this time next year, I can call myself a quilter, instead of just a wannabe!

Monday, September 14, 2009

Best Dog - The Muse

This is my first attempt at converting a photo to an embroidery design!

It was an idea that had been kicking around in my mind for awhile, and then I saw this post by Kirsty at Kootoyoo. My process is a bit different from hers, since I made a transfer to use on this linen fabric.


I started with this photograph...


...purloined from the Facebook album of Dearest Sister's Wonderful Guy. Since I was going to make a transfer, I used Picnik to reverse the image and then turn it into a pencil sketch.

You don't need to create an account to use the site. I uploaded the photo, selected 'rotate', then 'flip'. Then I selected the 'create' tab and found the 'create pencil sketch' option. Select 'save and share' and save it back to your hard drive. I am sure other photo editing software has similar options, but this one is free, so that is what I use.


Later, I discovered other options to adjust the heaviness of the 'sketch' lines, which would have made it a little easier, I think. I used tracing paper and a transfer pencil to create a pattern that I ironed on the linen.

Colors are not my strong point, especially using it in shading etc to create depth. That is why it was important in my first effort to choose a subject who would be kind in critiquing the effort!

Sunday, September 13, 2009

A New Way of Thinking

My embroidery projects began many years ago with stamped linens and samplers. When I first saw the Sublime Stitching patterns, I began to think in terms of 'what can I embellish?'

And mostly, the answer was tea towels...

After I was introduced to the wonderful blog phenomenon and the patterns and ideas shared within, I made some softies and many, many onesies.

Martha, at Q is for Quilter, introduced the idea of using coloring books as embroidery patterns to me. Previously, I always depended on hot iron transfer designs, but after seeing Martha's wonderful projects, a new source of inspiration was opened up to me.

This weekend, I ventured into another area of design source - photographs!


My original plan was to try some landscapes, but I decided to try a 'portrait'. I will never have the artistic creativity to do portraits as wonderful as Jenny Hart, but I think it turned out to be a passing likeness.

But the test will be if anyone recognizes it!

Monday, September 7, 2009

Labor Day Labors

This was a very low-key holiday weekend for The Mister and me. We did some errands and went out to eat but mostly just stayed around the house.

Today, I worked on this:


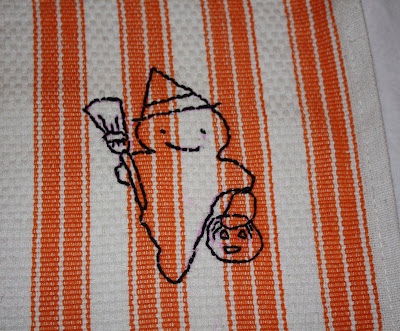
I saw these dish towels at the grocery store quite awhile back. The were marked 75% off along with some 'flour sack' dishtowels (which is what first caught my eye). The orange just said "Halloween" to me and even though I wasn't sure about stitching on this type of weave, I bought the two or three packages that were left. After all, at 75% off, they were practically paying me to take them away!

Today, I went through some motifs that I have been collecting and decided on this one. It is a free pattern from Annie Oakleaves. She has some very cute designs!

I picked these three trick-or-treating ghosties!


A ghostie-witch!

A vampire with his cape and Eddy Munster hair...

...and my favorite - The Bride of Frankenstein!

The weave was a bit tricky in the white stripes, but I used 6 strands of floss (except for the jack-o-lantern where I used 2 strands) and the chunky-ness covered any issues.

This year at Halloween, we plan to be in Beatty, Nevada for the annual "Beatty Days Festival". They have a car show, chili cook-off, a parade, bed races and lots of other small town fun. The car show participants (usually about 30 or 40 cars - very small town!) have been asked to provide goodies for the kids to "trunk or treat", so I will use this to line whatever basket, or bowl we use for the candy.

I hope you all had a good and restful holiday!

Wednesday, September 2, 2009

Stretchy Stitching - A tutorial-ette

I have really enjoyed embroidering vintage designs on little onesies this summer - about twenty in the last six months, or so. It seems that it is the baby season for many in my world!

I have learned a lot and improved my technique (and the quality of the results), and a few of you have asked me to share the process, so I put together a few tips.

This is what I have found that works for me. I am sure there are other ways that may be better, easier, more polished, but that is one of the best things about the internet, we can keep learning as we go!

This little lightning bug was in a coloring book and is the first motif that I have used that is not from the 'Story Book Trims' that Martha shared. It is a simple design that I thought would work well for demonstration.

These are the raw materials. The floss is not the floss I used. These were handy and added color to the photos...

I have been using "Totally Stable" iron-on tear away stabilizer. I picked it up at a thrift store, but I have seen it at Jo-Ann's etc. The instructions are very confusing to me and I think they are geared more to machine embroidery, so I just developed my own process. (honestly, I think wax paper would work, but I haven't tried it)


I cut a piece of the Stable that is a little wider than the hoop and 10 or 12 inches long, so that I can get more use from it. This photo shows the onesie wrong side out. The Stable goes under the fabric that I am stitching on.

I use a non-adjusting hoop, because I don't have an adjustable one that is small enough for the tiny shirts. I don't push it down all the way, because that stretches the fabric. An adjustable hoop might be easier to work with, but I get along with this one pretty well.

For the small motifs, I have been using two strands of floss in most areas and one strand for really tiny details. To minimize knots, I double a single strand.

I pull the first stitch through the loop in the end of the thread to avoid the need for a knot.

I use the back stitch, mostly. I poke the needle up through the fabric and pull it through...

...then poke it back down. This allows me to be place the needle very precisely. Since these designs are so small, it still goes pretty fast. The first few stitches kind of anchor the fabric to the stabilizer, so you may need to use your thumb to hold the fabric as you bring the needle up for the first stitch or two.
When I am finished with a color (or at the end of the thread), I make a knot very close to the last stitch and then weave the needle through several other stitches to anchor it. Then I trim the tail end very close.
This is the wrong side, after I am finished stitching. (You can see the holes from previous projects in the stabilizer.)

The needle holes perforate the stabilizer, somewhat, but I put my thumbnail along the stitching end to tear against to prevent pulling and distorting the fabric.

After I tear around the outside, I use pointed scissors to try to tear away as much as possible. In areas with a lot of dense stitches, sometimes a little bit is left.

Ready for the next one!

Please let me know if you have questions. When I write processes or procedures at work, I usually ask someone to read through it and see if it makes sense, but The Mister has gone up to bed already, and the kitties are not interested in helping me!