Saturday, May 28, 2011

Finished before deadline!


As usual, May has shaped up to be one of the busiest months of the year! I hope everyone is having a good spring!


This is a project that I started way later than I should have, but I didn't have a fully formed idea in advance, so I couldn't have really started earlier than I did...

Embroidered birthday message using Sublime Stitching's "Epic Alphabet" transfer pattern.

We are celebrating my Dear Aunt's 90th birthday this weekend. Her true birthday was a couple of weeks ago, but in the same fashion as Queen Elizabeth, we are celebrating on a different day to accommodate the masses (or at least the cousins!)

I was trying for weeeks to think of a gift idea, something that she would remember after we left (the reliability of memory is not something we take for granted, these days).


I decided on a pillow that could serve as something celebratory and useful. I stamped the letters on Sunday evening and madly stitched in the evenings, and through lunch hours and a quilt guild meeting, but I still had a letter or two unfinished when it was time to leave. So, I packed up my sewing machine and supplies and finished the pillow on the road.


I used Kona Bahama (I think) for the inner border and a very fun dotted fabric that I picked up after the guild meeting for the outer border. The letters were stamped on a remnant that I picked up at Joann's.


The back is Kona Snow and I quilted it in a grid pattern with 2" squares. I brought some Pigma pens so that everyone attending the party can write a message or an autograph on the back of the pillow.


This is the first pillow that I have made and it was a very fun project, except for the looming deadline. I enjoyed experimenting with color combinations and stitches on the letters and it was a good small project learning experience of quilting and constructing the pillow cover.


Since a lot of my 'hand crafted' gifts seem to wind up being 'belated', I am proud that I finished this one in advance, even though it came down to the wire.


Maybe for her next 'milestone' birthday, I will be more organized. Maybe.

Sunday, May 1, 2011

Finishes! Finally!

This weekend, I checked some things off my list!

I revisited the Quilt of Frustration and now it is the Quilt of Snugly Goodness:

Before washing:
After washing:
I am really pleased at how it turned out. My goal was to practice machine quilting with the walking foot. I did get some practice using the foot, but didn't really practice quilting patterns. I have another idea that will allow me to practice on another project.

I also finished a pin cushion project that I started a few weeks ago. The one that I had been using was about 30 or 35 years old and quite dirty. My mom stitched it up from some scrap wool and stuffed it with hair clippings collected for her by the beauty shop. It had a halo of hair sticking out all around it and was pretty tacky. I didn't really notice how tacky it was, until I took it with me to a quilt guild meeting and saw it in another 'setting'.

So, I decided to make one from some wool that I picked up at an estate sale. One of these days I am going to do an embroidered wool quilt, so I thought I would try my hand with a small project.

I decided on kind of a sampler design, but I didn't think my usual method of hot iron transfer would net a good result, so I basted in some guide stitches and kind of went free hand, but with a guide.

You can see the light tan basting stitches in this photo.
I outlined a square in pencil, then made marks outside those lines at intervals and ran basting thread all around and connected the intermediate lines.

This was my pattern guide.
After I finished the embroidery, I quilted it with some batting and a lining for stability and stitched it up. I stuffed it with batting and fabric scraps, but it just didn't have the same 'grab' that I was used to, so I opened it back up and pulled the stuffing out and replaced it with some wool roving. The roving was just the ticket and now I have a new favorite pin cushion!

Plus, I learned a new stitch, the Colonial Knot. I don't think I will ever need to do another French Knot, again!

I also finished a Christmas gift - unfortunately, it was a 2010 gift, that is now horribly late, but better late than never, I think! And, I finished up a couple of pillow case dresses that I hope are the right size for two little girls that live near the mountains.

All that, just so I could get started on the blocks for a challenge that we kicked off at the last meeting of the Las Vegas Modern Quilt Guild. We handed out charm packs at the meeting (generously provided by the Robert Kaufman Fabric Company) with the challenge to use every color in the pack (41 different ones) and only add two additional solid colors in whatever quantity required.

I have been searching for some inspiration for the last few weeks and finally decided on a design. I Sketched it out on some graph paper and made four blocks today. I was pleased and a little surprised that they turned out pretty much as I envisioned them. I am going to set a goal to get at least eight blocks done each weekend in order to stay on track for our July 'reveal'.

I feel good about wrapping up some loose ends today! Not as good as the President probably feels about finding Osama Bin Laden, but pretty good, just the same....

Sunday, April 24, 2011

Default to stitching...

April has been a busy month! I have a list of projects in my notebook and more in my head that beg for attention, but I am struggling to actually produce a 'finish' before starting something new! I did get one or two things finished up this weekend, but not as much as I had planned - no surprise!

One the quilting front:
Earlier this month, I started a rag quilt as kind of a skill builder for machine quilting.

I found the fabrics in the remnant bin at Joann, but they were all one yard cuts, as if someone had gathered the fabrics for a project and then changed their mind before check out. And, since they were on 'regular' sale plus the remnant discount, they practically paid me to take them away!
I got pink, yellow, violet, green and blue gingham check and small dot flannels and I added a couple of solids from the stash.

Without much invested in the fabric (I used remnant batting, too) I decided to use a pattern for a 'crazy rag quilt' that I picked up on sale, just for professional guidance.

Which was a giant mistake.

I cut everything as directed, sliced up the 'crazy' squares, mixed them up and started sewing them back together, but they weren't big enough to trim to the required dimensions. Since consistent seam width seems to be an ongoing challenge for me, I measured and measured again and pressed and repressed, and finally decided to just make my seams a bit more 'scant' so the blocks would be closer to the correct size.

When I got them all sewn and trimmed, it was pretty late and I should have gone to bed, but I was pretty pleased with myself. I wanted to stack a few together and maybe lay a few in a row and see what they looked like. But, when I started reading about stacking the little sandwiches together, the pattern went all crazy on me. It said to put the 'flannel' square in the middle of the sandwich, despite the fact that earlier it told me to cut batting 1/2" larger than the flannel that was now mentioned ( I know that you can use flannel or batting in rag quilts, but I expected consistency within the pattern) and the 'crazy blocks' were described as a half inch smaller than the pattern earlier had referenced, as well.

The pattern had a website listed which turned out to be a quilt shop in Texas. The same pattern was for sale, but the dimensions listed were a bit smaller. No doubt someone, at some point discovered the error and adjustments were made.I emailed the designer and asked if she had the updated instructions in a pdf that she could send me. I know that I can figure it out without the instructions, but I was so irritated that I would have to re-trim the blocks and the batting! I just wanted to tell someone how frustrated I was at wasting so much time and the amount of 're-do' ahead!

The designer answered my email and said she would 'look into it', but I haven't heard back from her. I have gotten as far as re-trimming all the blocks and I re-cut the batting blocks to the right size. But it has been sitting in a bag for the past couple of weeks.

Anyway, after that frustration, I decided that I needed a project that didn't require so much thinking and figuring out!

I had stamped these onsies in February, with the thought that they might be a travel project for my trip at the first of March.
Blue Swallow
Space ship alien.
Coral Kitty
They are intended for a small girl in Utah. I hope they have just a few more weeks of 'long sleeves' weather so she might have use for them.

The designs are from Jenny Hart's "Sublime Stitching", one of my favorite resources for embroidery patterns. First, because she has so many cute patterns, but also because she is one of the few sources for transfers. Not that I'm lazy, you understand. I just want to be able to decide on a pattern, iron it on and stitch away.

Or at least stitch away after two months or so...

Sunday, April 3, 2011

Taking the Tiny Car on the Road

This past weekend the 31st Annual "Southwest Unique Little Car Show" was hosted in Upland, California. The Mister and I loaded up the tiny car on Friday and headed out of town.
So shiny with a fresh wax and polish!

We stayed at the 'event headquarters', and there was lots to see in the parking lot!
This is a Zundapp Janus - it looks the same coming and going, with a door that opens in the front and in the back. The yellow car behind it is a Nash Metropolitan.

On Friday night, after check-in, about 80 participants "cruised" about 2 miles to the home of the couple that organized the event. I was not comfortable driving in Friday rush hour traffic on a busy street, so we drove the pick up and I took some photos as folks were arriving.

The driver of this tiny little Peel Trident had no reservations about driving in So Cal traffic. I guess he was sure that other drivers would see the smoke from his engine and get out of his way!

Doesn't it look like George Jetson's car? Only not flying through the air...
This was the scene on the street in front of the hosts' house on Friday night! (Please ignore the shadow of the photog!)
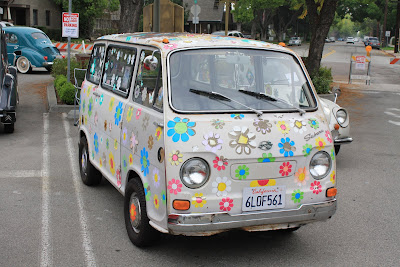
The flowers on this Subaru van looked like they had been on it since the 70's!
At the show on Saturday, there were about 125 micro cars and mini-cars. The 'rule' is that the engine must be less than 1000cc to enter. And most were from the 50's and 60's, but there were some interesting ones that were newer. No Smart-4-2's this year, though.

One marque that I had not seen before was this Singer! I will have to do a bit of research to see if it is related to my featherweight!

Here we are, parked at one of the main entrances to the show, so we had a lot of folks stop and look. I am not sure what model the blue and white car is. It was in 'survivor' condition and was missing all of the badges.

It was nice that the show was in a commercial setting. There were lots of shops and places to eat. I visited a few antique shops but my souvenirs came from the Upland Sewing and Vacuum Store:

I have been reading about 'that quilt' for a few years. I am not sure I will try to do the whole thing, but if I do, it will be red and white. I am guessing it will take me a long time to finish and red and white never looks old fashioned (well, not to me, anyway...)

We left before the awards ceremony, since it was getting late and we wanted to head home early today. I am pretty sure that we didn't win any trophies, this year. There were about 7 or 8 other Isettas there. Since it was not participant judging, I am pretty sure that others with more original restorations would carry the day.

The weather was nice and we had a great time, though. People who like funny little cars are an interesting bunch!

Sunday, March 27, 2011

Stars of Valor Blocks

I am taking these blocks to the Las Vegas Modern Quilt Guild meeting on Thursday to be sent with other blocks to Moda Fabrics as part of their "Just One Star" project. You can read more about it and how to join in here.

They are shown hanging from my sock 'chandelier'. A laundry day 'must have' for small spaces and wool socks!

I am not sure why, but I am having difficulty taking sharp photos these days, so you can't tell that one of the reds is a tiny stripe and the other is a tiny dot pattern. The blue has little swirls and tiny gold dots that kind of remind me of a starry night. (Kind of a star in a star thing.)

It was a good exercise for me to follow the instructions for cutting and piecing. I think that I finally have gotten the hang of a consistent seam allowance, as all three blocks turned out the same size. The star points are not all perfect, but there is really no overt wonky-ness!

I didn't have very much cream 'tone on tone', just a couple of small pieces from a scrap bag that I got at the lqs. I supplemented with Kona 'bone' for the large triangles.

I also finished up my name tag for the meeting this week. I am not thrilled at the result. It looks a bit like a coaster on a string, since I made it to hang around my neck. It is essentially a very tiny quilt and pretty stiff since I got carried away with the quilting. Another good learning experience, though. I think I will make another and use the first one for a luggage tag on my sewing machine case.

I am looking forward to the guild meeting this week. It is so inspiring to see what everyone else is working on!